Creating perfect symmetry in your iPhone photos is immensely satisfying, but shooting a perfectly symmetrical photo is much harder than it looks. It’s easy to get the photo 90% right, but that last 10% is what transforms a good symmetrical photo into a great one. In this tutorial you’ll discover eight highly useful shooting and editing techniques that will help you create perfectly symmetrical iPhone photos, every time!

We recently published a tutorial on how to find and create amazing symmetry in your iPhone photos. This article showed you how to find symmetry in cities and in nature, and how to create your own symmetry using reflections and apps. It also pointed out that symmetrical images which feature a non-symmetrical element can delight and surprise your viewers.

The beauty of a symmetrical photo is the mirroring that happens on either side of the line of symmetry. The scene itself can be gorgeous in a restrained, minimal way, but creating a perfectly symmetrical photo can also be a testament to the skill of the photographer.

So let’s take a look at eight ways to improve your iPhone symmetry shots by looking at shooting techniques, how to test whether your photo is truly symmetrical, and how to fix photos that aren’t quite perfect out of the camera.
1. Stand In The Middle
Once you’ve found a symmetrical subject or scene, you need to compose your shot so that the line of symmetry is perfectly central. To achieve this you have to make sure that you’re centered with regard to your subject.

If you’re shooting a building, look at the structure to help you find the exact middle. You can count the number of windows or columns to find the center, and then make sure you’re aligned with that central point before you even look at your phone.
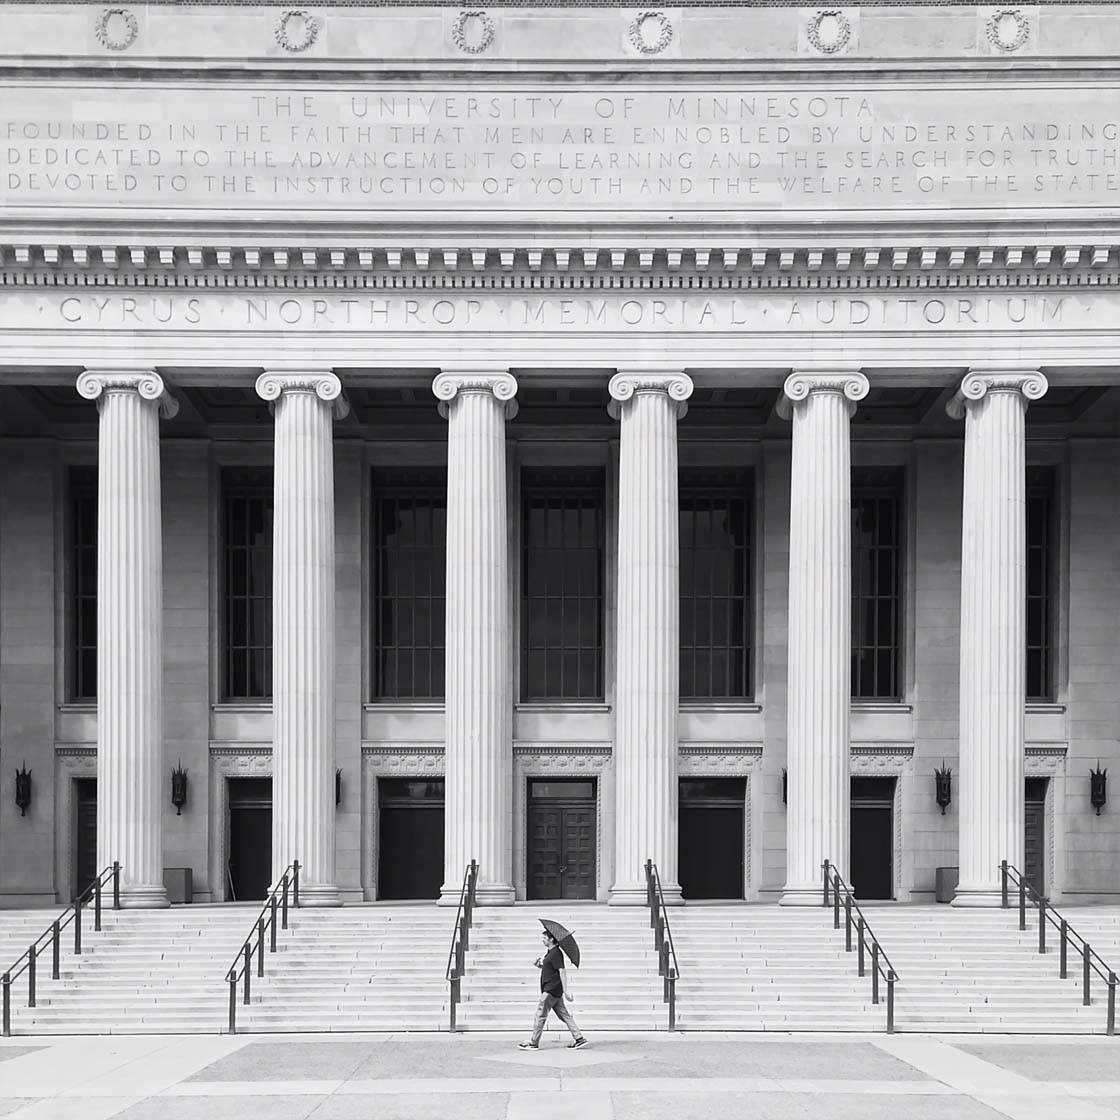
The building can also give you other clues, for example, there might be a light fixture over the door which you can make sure lines up with the doorway. If you’re not standing in the EXACT center, it’s not possible to get a perfectly symmetrical shot.

If you’re inside, the clue to finding the center might be right overhead or below your feet. Perhaps the lights are lined up along the center of a hallway, or maybe there’s a pattern on the floor that will help you find the central point.

Making sure that you’re standing in the middle is the most important step in taking a symmetrical photo. Practice finding the central point and then composing your shots to create better symmetry in your pictures.
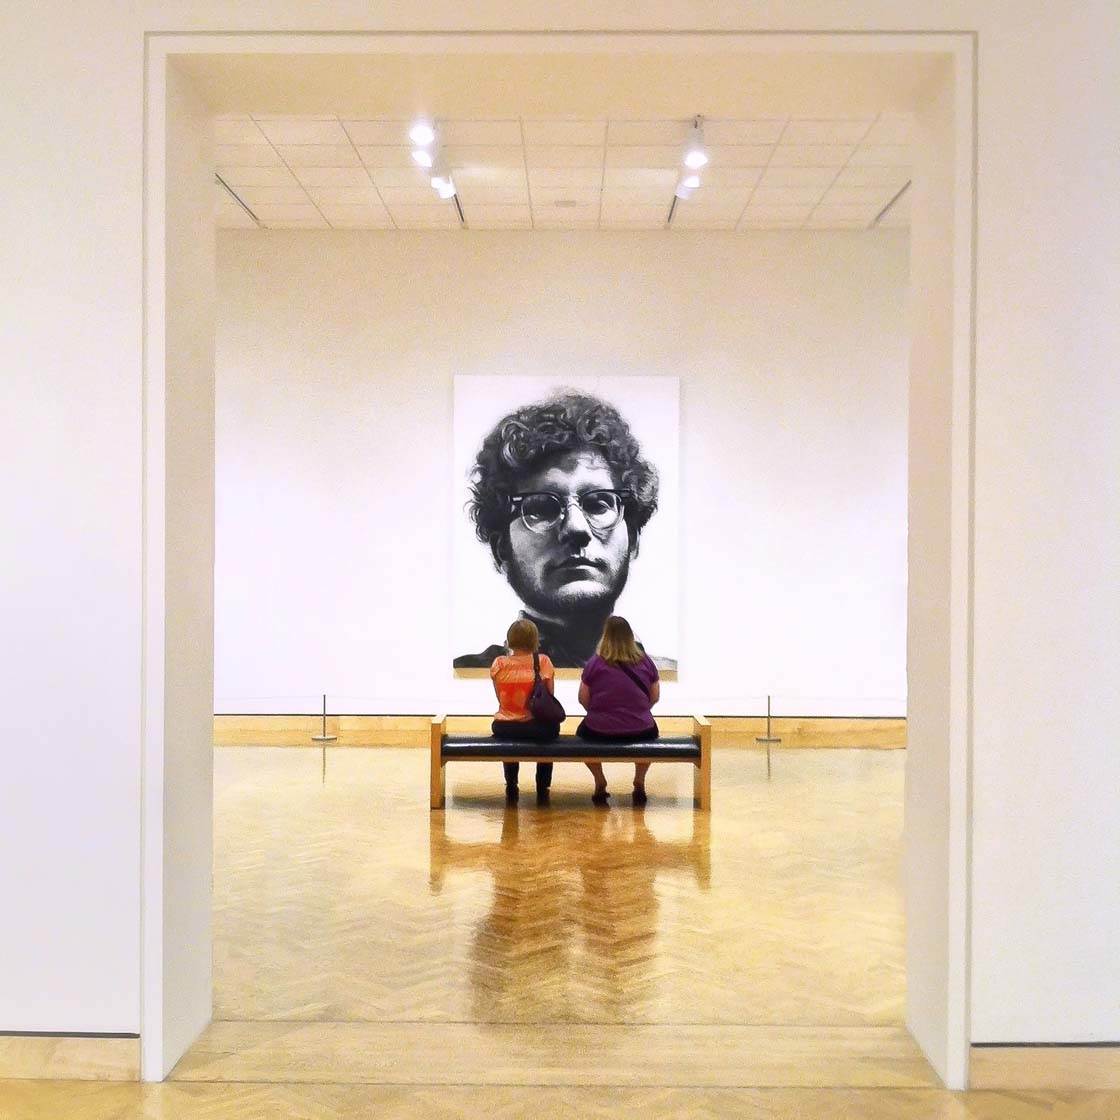
This is also a good time to make sure that everything in the frame is aligned correctly. Maybe you’re standing in the exact center, but there’s some furniture that isn’t arranged symmetrically.
Now is the time to go fix that! If you don’t put something perfectly symmetrical in front of the camera, you won’t end up with a symmetrical photo.
2. Use The Grid
One of the things that makes it difficult to shoot symmetry is that it’s very easy to have your phone at a slight angle. If you’re shooting a highly symmetrical subject, any small error will easily be noticed.

You have to make sure your phone is completely level, as well as square to the subject. It’s easy to accidentally have the left or right side of your phone slightly closer to the subject. Even a few millimeters can ruin your shot.
Fortunately, there are tools that can help make your photos more symmetrical, and one of the best is the grid overlay in your camera app.
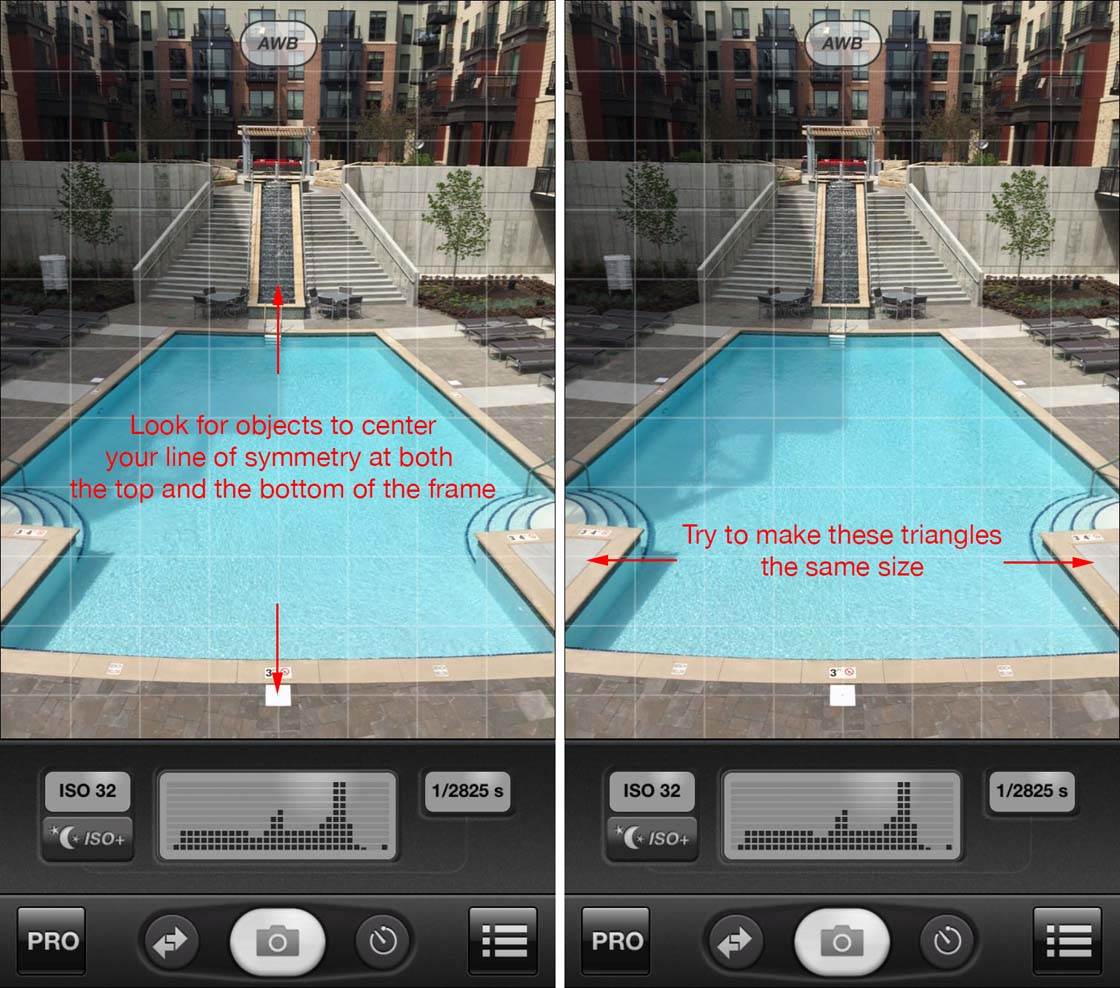
The native Camera app on the iPhone has a grid that you can turn on by going to Settings > Photos & Camera > Grid. This grid can help you make sure that your image is symmetrical by comparing the lines of the image to the lines of the grid.
Most third-party camera apps, such as ProCamera, 6×6, and VSCO Cam have a grid feature that you’ll be able to switch on using an icon or the by going into the app’s settings.

Since the subject you’re shooting is symmetrical, look for clues all around the frame to help you line the camera grid up perfectly.
Check to see if the distances are the same on both sides of the frame, and look for matching shapes to see if they’re the same size. Keep looking around the frame until you get everything even, and then shoot away!
3. Use A Level
In addition to the grid, several apps have a built-in levels feature which uses the iPhone’s accelerometer to check if the phone is level. Having a level shot will go a long way to making your end result perfectly symmetrical.
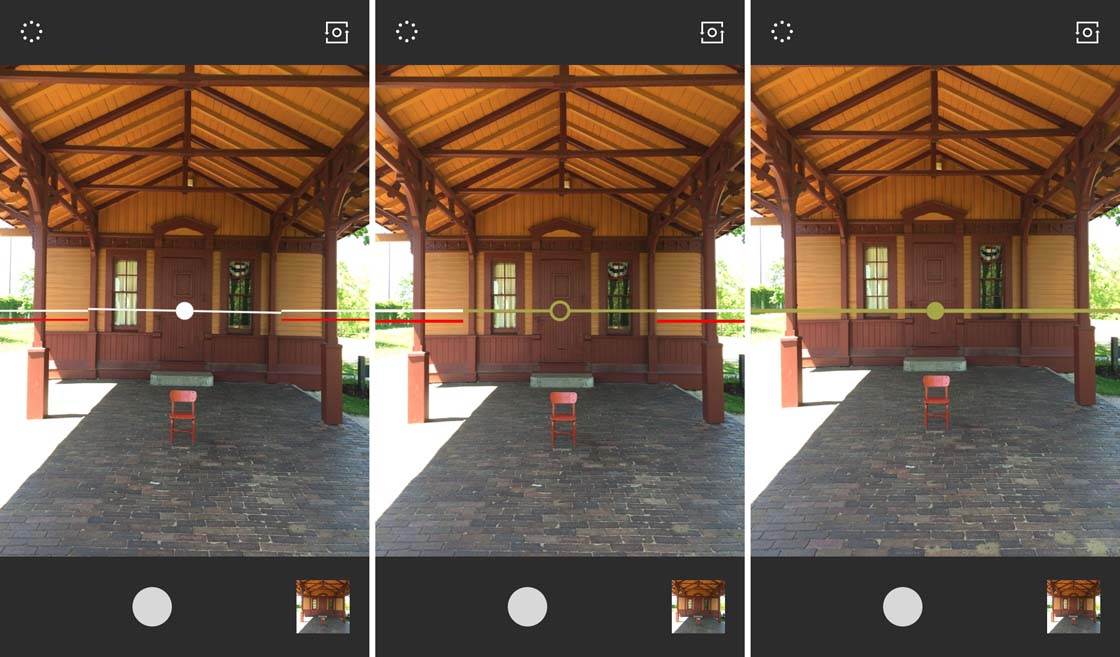
The camera built into the VSCO Cam app is great for this. It gives intuitive feedback to let you know whether your camera is level left to right, as well as front to back.
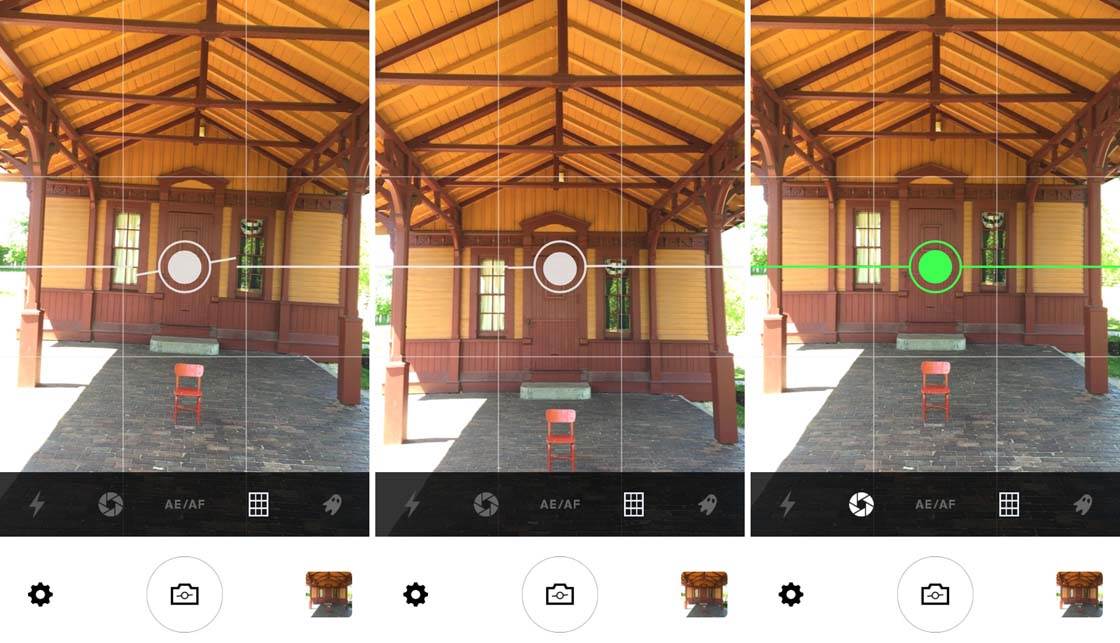
The LVL app works similarly, although it doesn’t seem quite as precise. However LVL has a setting where it will automatically shoot once your phone is level, which is handy for tricky situations where you need to shoot one-handed.
4. Shoot In Square Format
Sometimes it’s easier to get a perfect shot if you shoot in square mode instead of the normal rectangle aspect ratio. This is especially true for subjects that are round.

Using square format for round subjects makes it easier to compare the distance between the circle and the edge of the frame on all four sides. Getting your subject perfectly central is the key to creating amazing symmetrical photos.

This photo was shot using square mode in the ProCamera app, so that I could align the center dot with the center of the dome.
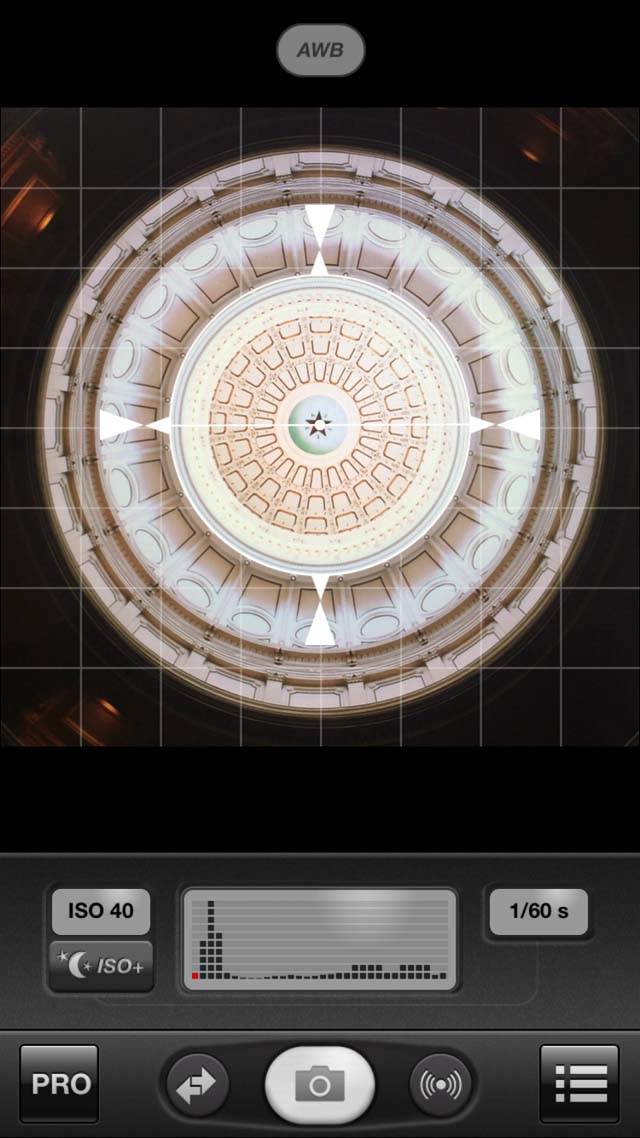
Square format allowed me to easily check if my phone was completely level by looking at all four sides of the image. All I had to do was to ensure the edge of the circle was aligned perfectly within the square.
5. Hold Your Breath & Shoot a Lot!
Once you’re aligned correctly, take a breath and hold it so that you can freeze your body position for a few seconds. It might sound crazy, but holding your breath can help prevent a tiny movement that will throw your careful framing out of balance.

Once you’re perfectly aligned and holding your breath, make sure to shoot a lot of photos. You can even shoot in burst mode by holding down the shutter button. Then you can go back and look for the one shot that’s perfectly symmetrical.

Remember that it’s smart to give yourself choices when you go to edit your photo later, so don’t be afraid to overshoot and take a lot of photos. When I’m trying to achieve perfect symmetry my camera roll will often look like this:
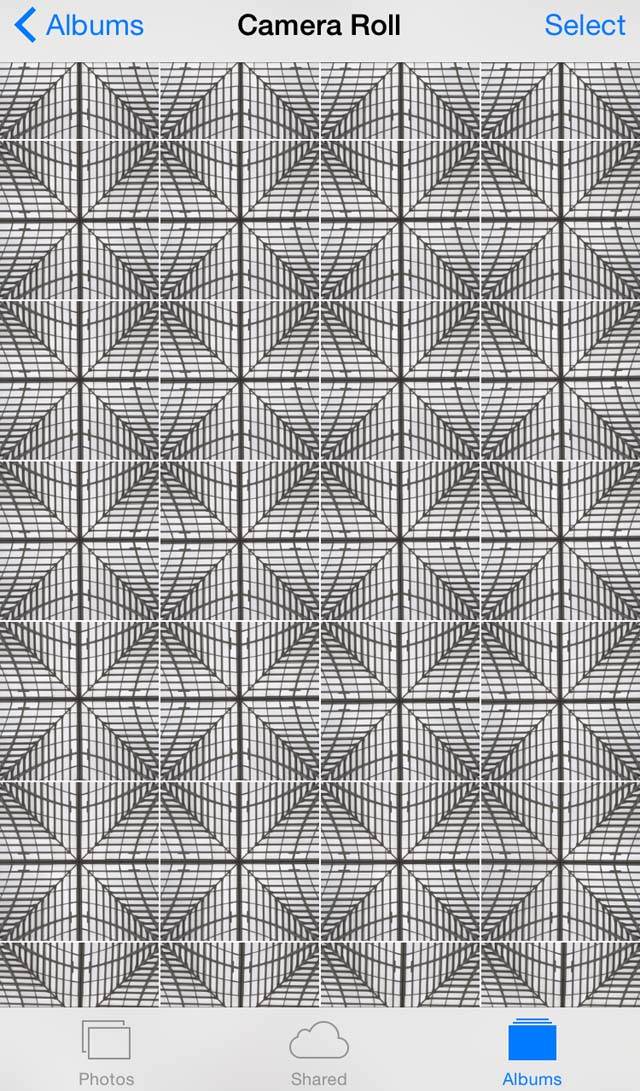
It’s full of images that are virtually the same, but each one will have subtle differences due to tiny movements that I made while taking the photos. Somewhere in there will be the perfect symmetrical shot!
6. Use An iPhone Tripod
iPhone tripods are especially useful for shooting symmetry. You can tweak your framing to make sure the photo is perfectly aligned, and then compose the rest of the shot. And you don’t have to hold your breath while you shoot!

For this shot it was too difficult to hold the phone in the perfect position as well as hold the crystal ball where I wanted it. Since I was by myself, I positioned my iPhone in the center of the room using a MeFoto Sidekick360 Plus phone holder and Pedco UltraPod II tripod.
I could then concentrate on holding the ball in the middle of the frame with my left hand, while I pushed the shutter button with my right. This shot would have been very difficult to get right without a tripod.

If you don’t have a tripod, sometimes you can rest your phone on a railing, wall, table, bookshelf, or other solid surface so that at least you’ll know your phone is level and somewhat steady.
7. Use Apps To Check Your Symmetry
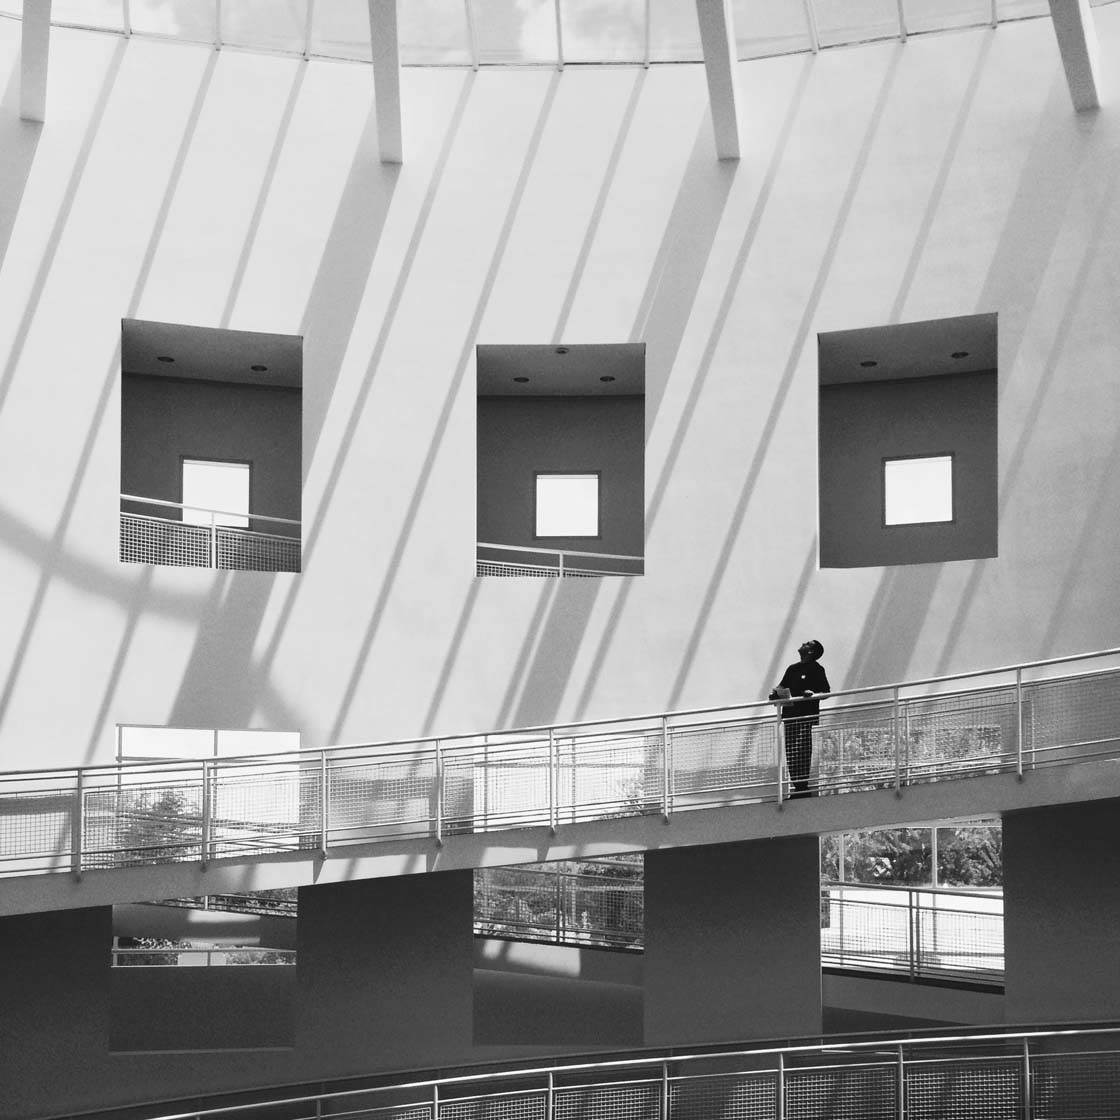
So now that you’ve shot what you think is a perfectly symmetrical photo, how do you check to make sure? It’s easy to be off a tiny bit, and if you’re a perfectionist you’ll want to have a way to test whether the photo is a perfect mirror or not.

The easiest way to test your shot is to bring two copies of it into an app like Superimpose or ImageBlender, and then flip one of them so you can check your symmetry. Below I’ll show you how to do this in both of these apps.
Check Symmetry With Superimpose
Open the Superimpose app, then import the same image into both the foreground and the background:

You now want to flip the top image horizontally. To do this, tap on Transform at the bottom of the screen, then tap Flip Horizontally at the top:

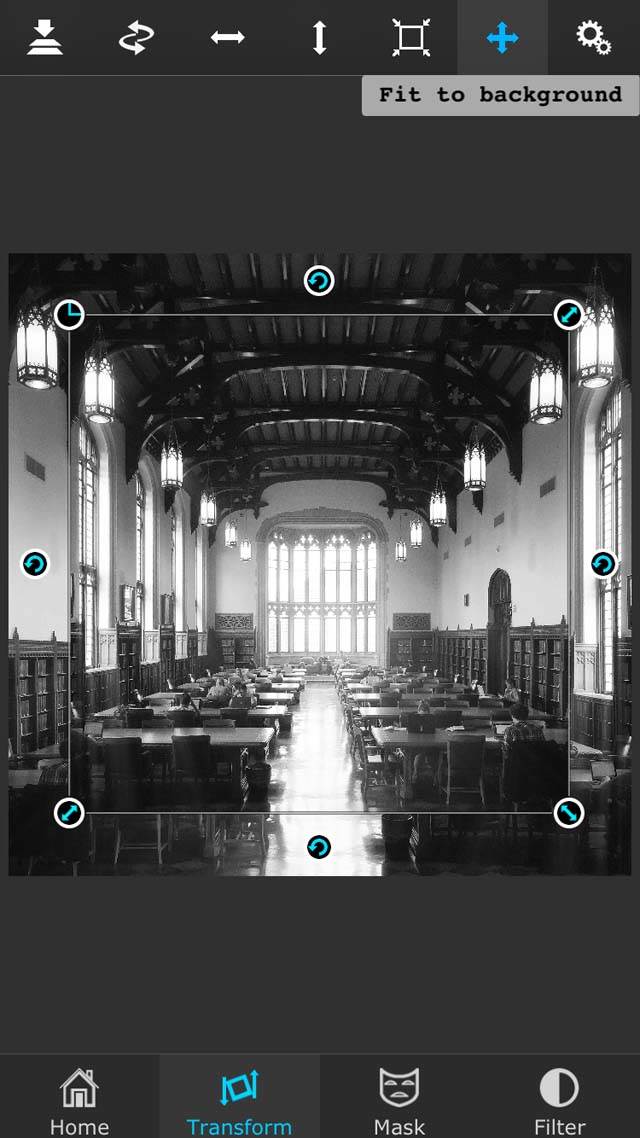
Superimpose imports the foreground image at a smaller size than the background, so you need to make them the same size. To do this, tap on Fit To Background at the top:
Now you need to make the top image partially transparent, so that you can see through it to the bottom image to check if they line up. To do this, tap on Settings in the upper right, then move the Opacity slider at the bottom to somewhere in the middle:
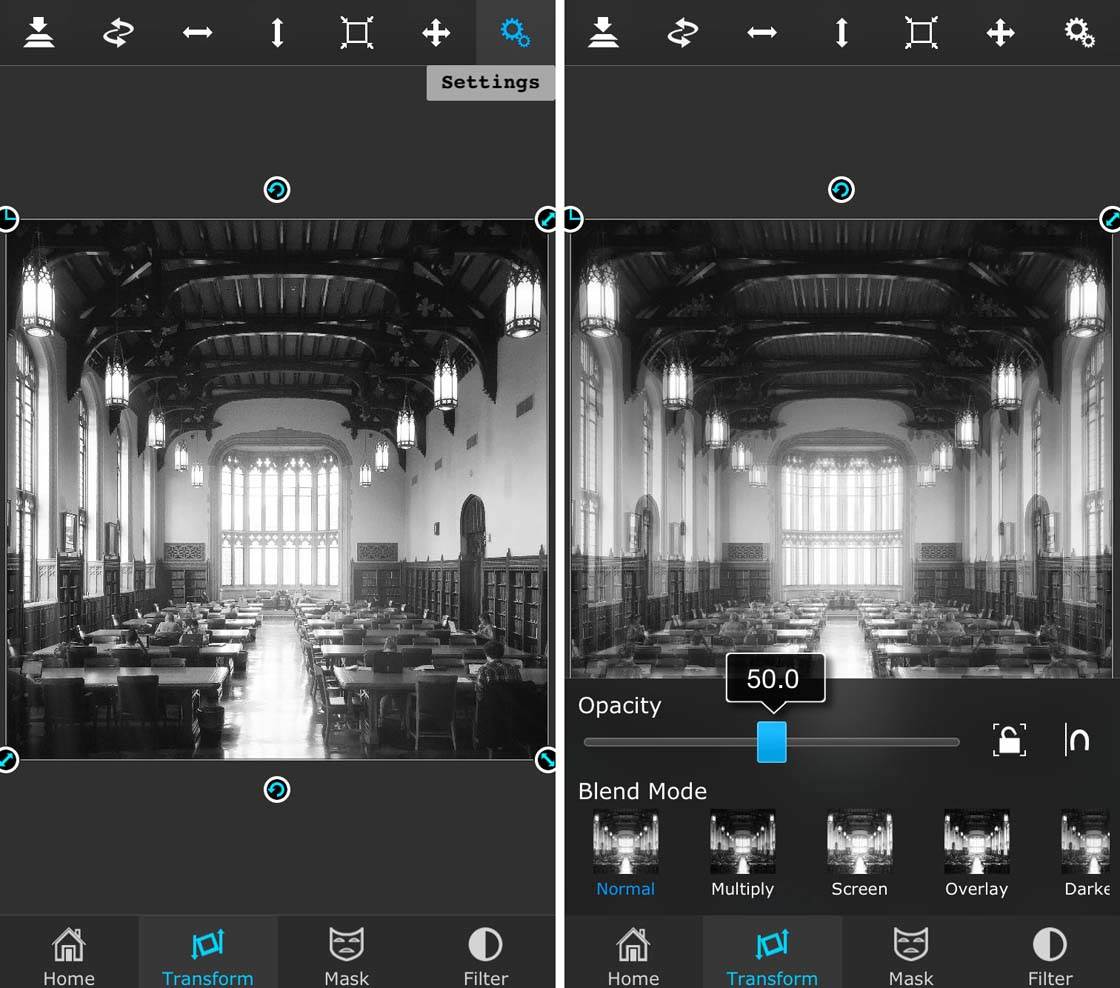
Now you can compare the two images. In this case I did a pretty good job of getting them lined up, but it’s not perfect. You can see the tracery in the window at the back doesn’t quite line up.
Check Symmetry With ImageBlender
Open the ImageBlender App, then load the same image on both sides, and leave the blending percentage at the default which is right in the middle.
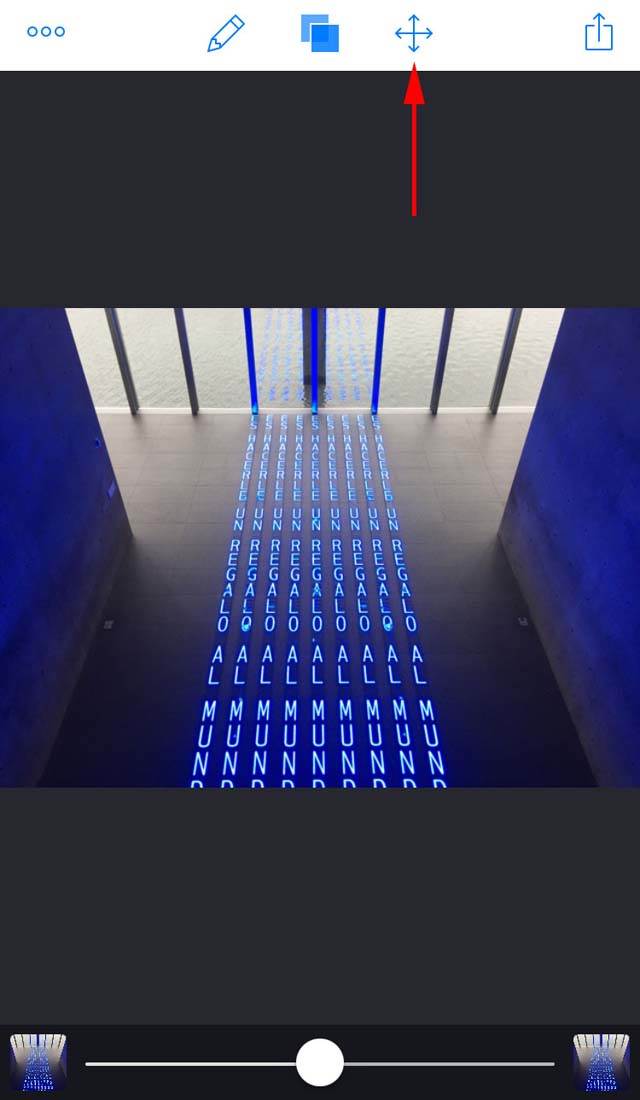
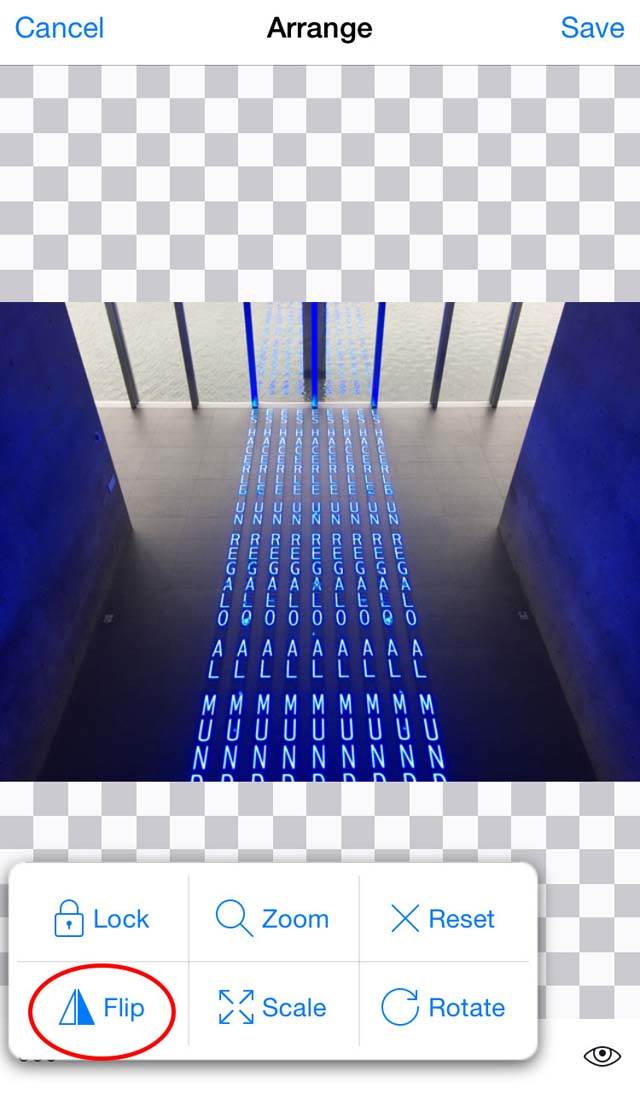
Now you want to flip one of them so that you can see if they line up. To do this, go to Arrange by tapping the cross with arrows at the top of the screen:
Now tap on the three circles in the bottom left:
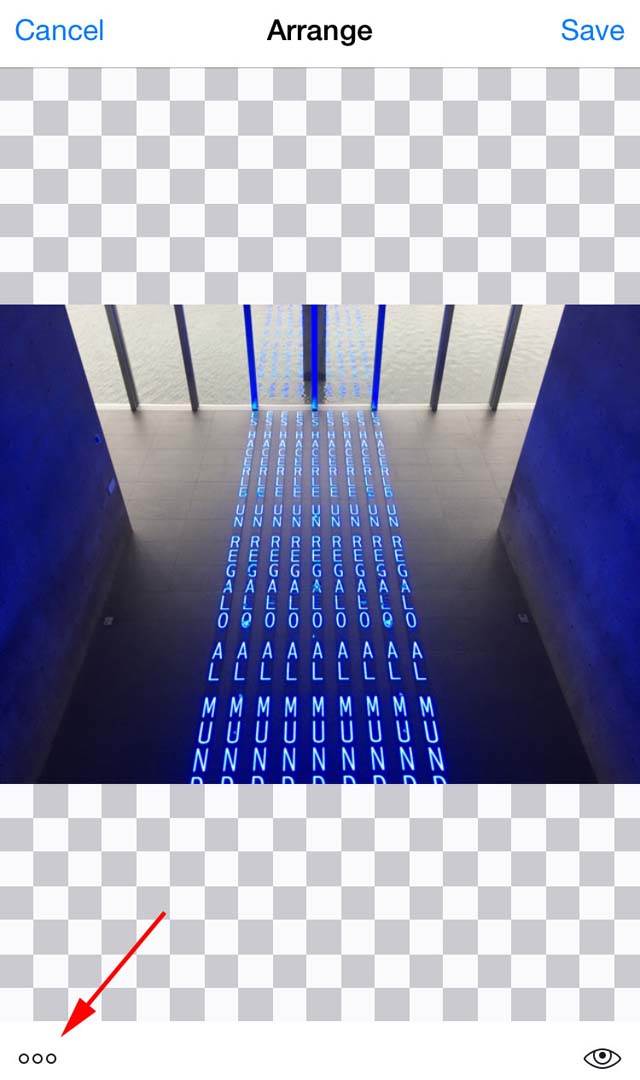
Then tap on Flip in the menu that appears:
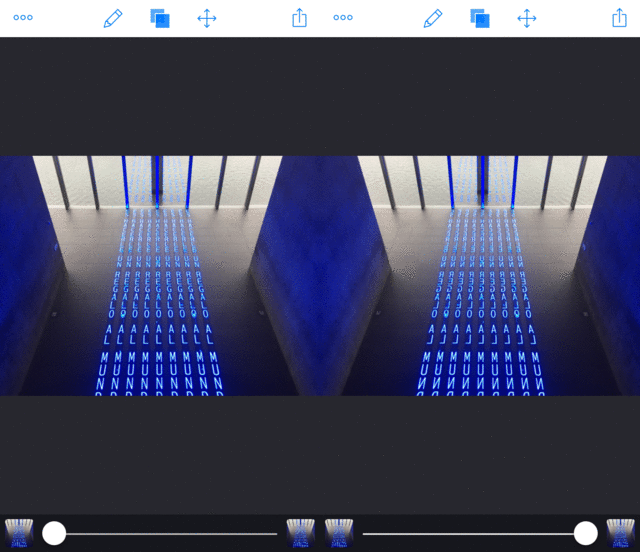
If you move the dot on the bottom slider from left to right, you can see if the images line up perfectly. In this case, I didn’t quite get my line of symmetry right down the middle. As I moved the slider I could see the image “dance” from left to right:
8. Use Apps To Fix Imperfect Symmetry
Now that you’ve learnt how to test your images to see if they’re symmetrical, what can you do to fix them if you didn’t shoot them perfectly? If you’re still at the location, it might be best to just try re-shooting the picture.
But if that’s not possible, there are apps that can help you fix small problems that happened during shooting. With apps such as FrontView, SKRWT and Superimpose, you can easily correct skewed images to create perfect symmetry in your iPhone photos.

Each app works a bit differently, so I’ll show you how to use the three I just mentioned.
Use FrontView To Fix Symmetry
Frontview is great for transforming images by skewing them in certain directions. This allows you to correct problems where you haven’t shot the symmetrical scene from quite the right angle. I often depend on FrontView to fix my symmetry photos.
When you load the photo into Frontview, you’ll notice that the app puts a box with four red circles on top of your image:
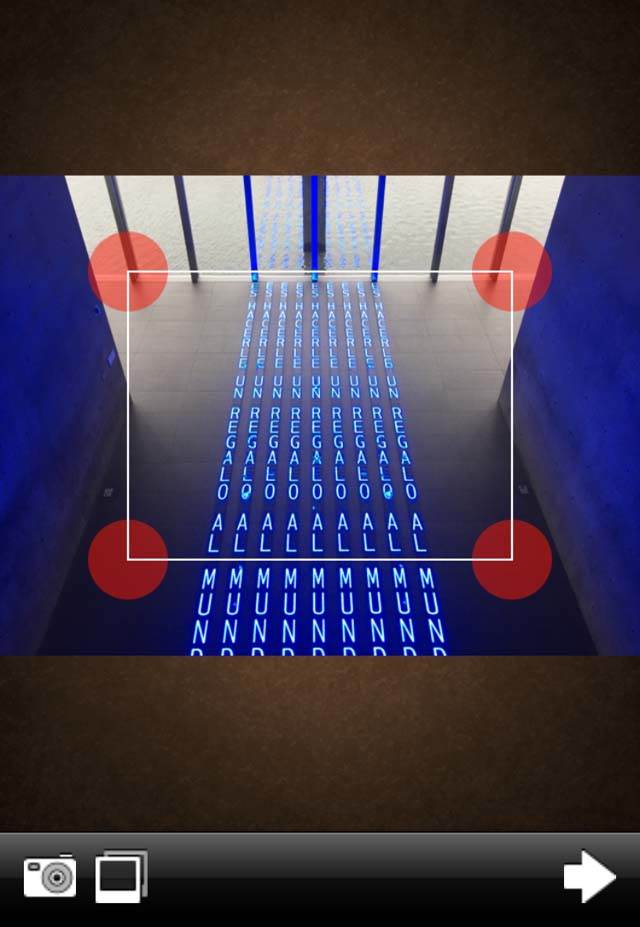
You can move the bounding box by moving those four circles, and wherever you place them is where FrontView will make the corners of the new image. But before you touch them, take a look at how the box fits over the image because it gives you a clue about what you need to do:
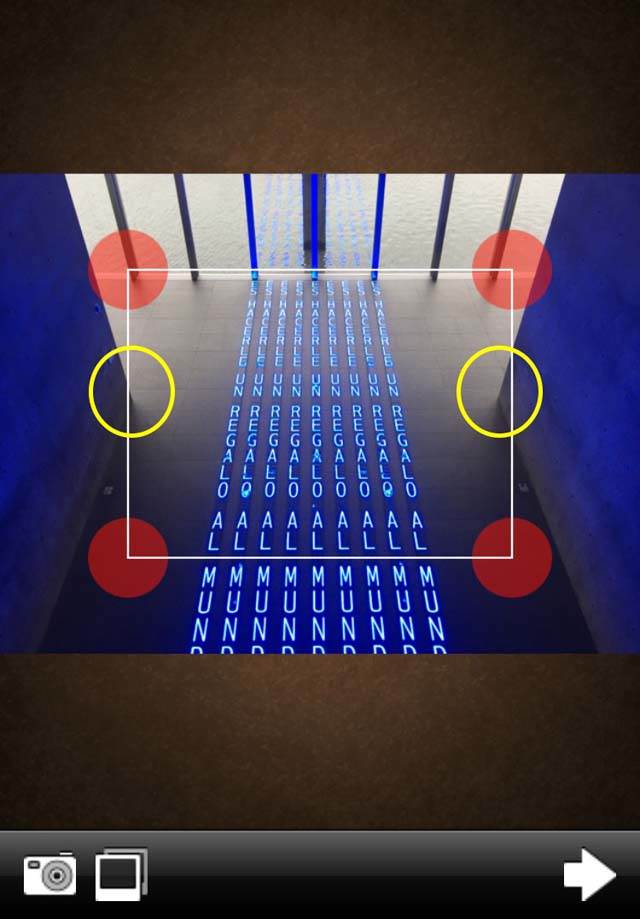
I’ve circled two areas in yellow. Notice how the triangle made by the corner on the right side is bigger than the one on the left. We want the image to be symmetrical, so we need to make the right side a little smaller to match the left.
And remember the results of our test in the previous tip? It told us that the bottom of the photo lined up pretty well, but the top of it was uneven. This was because I shot it with the line of symmetry aligned at the bottom but not the top.
So now we know we just need to adjust the top right part of the photo, and move that corner in toward the middle. Go ahead and push the other three circles completely into the corners, but leave the top right one out just a little bit:
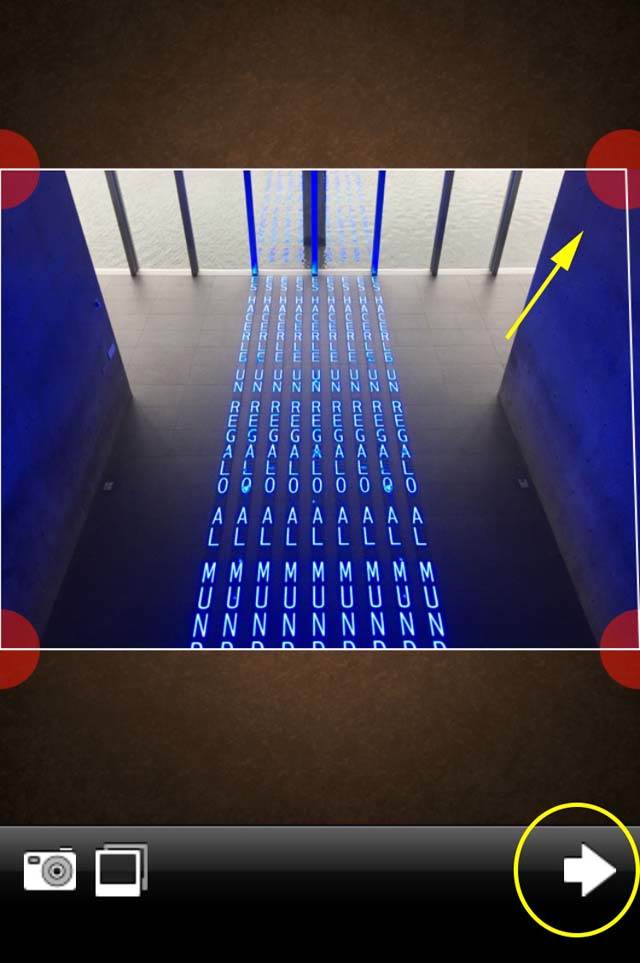
If you tap on the arrow in the bottom right, you’ll get a preview of your transformed image. Our goal is to make the shapes of the bluish walls on the left and right equal:
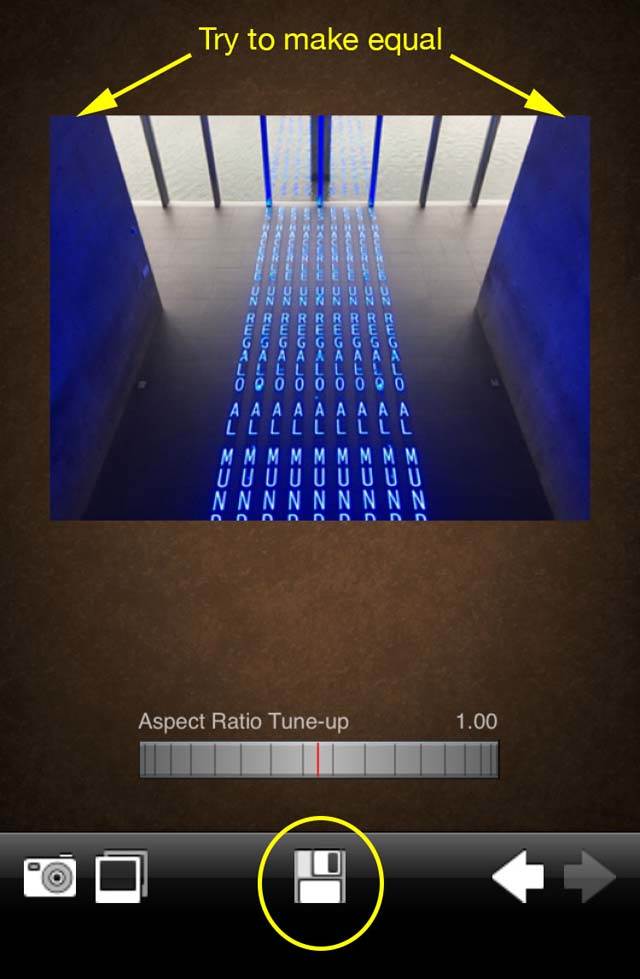
If they’re not quite equal, you can use the left arrow to go back and adjust everything. When you think you’ve got them even, go ahead and tap the Save button in the bottom center of the screen.
Now you can bring the photo into ImageBlender or Superimpose (as described in tip 7) to check how you did:
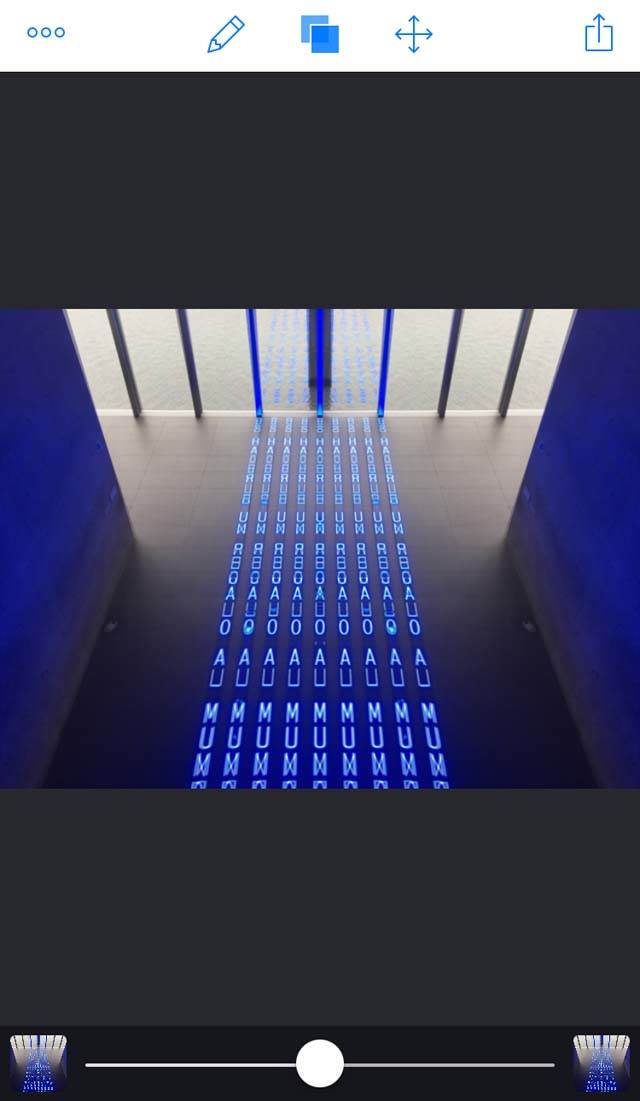
In this case I got it right on the first try! There’s a tiny bit of imperfection, but it’s so close that I don’t think anyone will notice.
Use SKRWT To Fix Symmetry
SKRWT is a great app for perspective correction, and by extension it can help fix symmetry on photos that were shot imperfectly.

In this image of the Kimbell Museum, my line of symmetry is pretty good. But the photo is a little crooked and I had the phone tipped back, so the vertical lines of the building aren’t straight up and down. Can you see how the vertical lines converge towards the top of the photo?
In SKRWT I started by adjusting the angle so that my horizontals were level. Then I used the vertical adjustment to make the building’s lines go straight up and down. The grid really helps you to line up the vertical and horizontal elements:
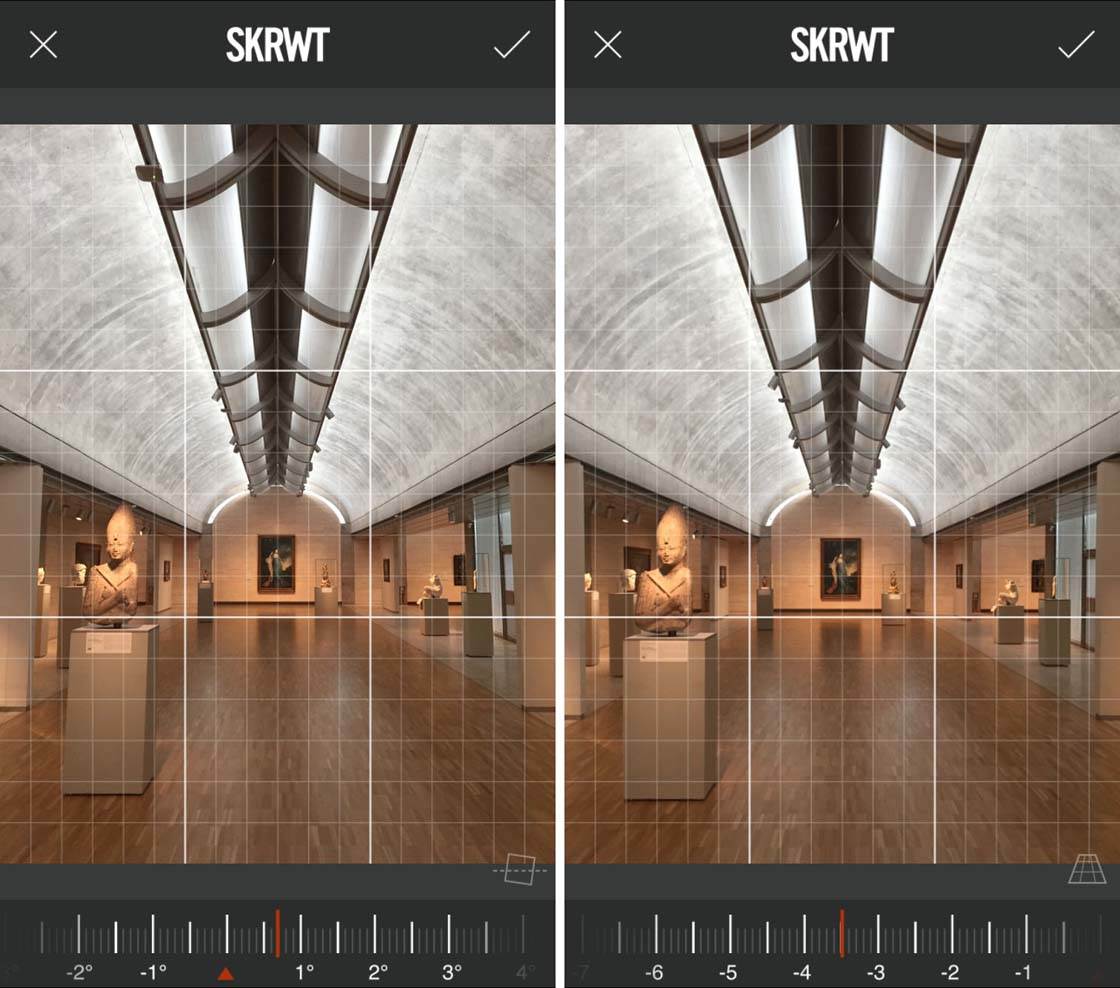
Finally I cropped it to omit the side walls. After color correction, the final result looked like this:

It’s worth mentioning here that the Instagram and Snapseed apps now also have perspective correction tools, much like those available in SKRWT.
Use Superimpose To Fix Symmetry
Sometimes when you look back at your photos, you’ll notice something about the space you were photographing that wasn’t quite symmetrical. When I was shooting these doors, I made sure I was lined up in the center of them and shot this photo:
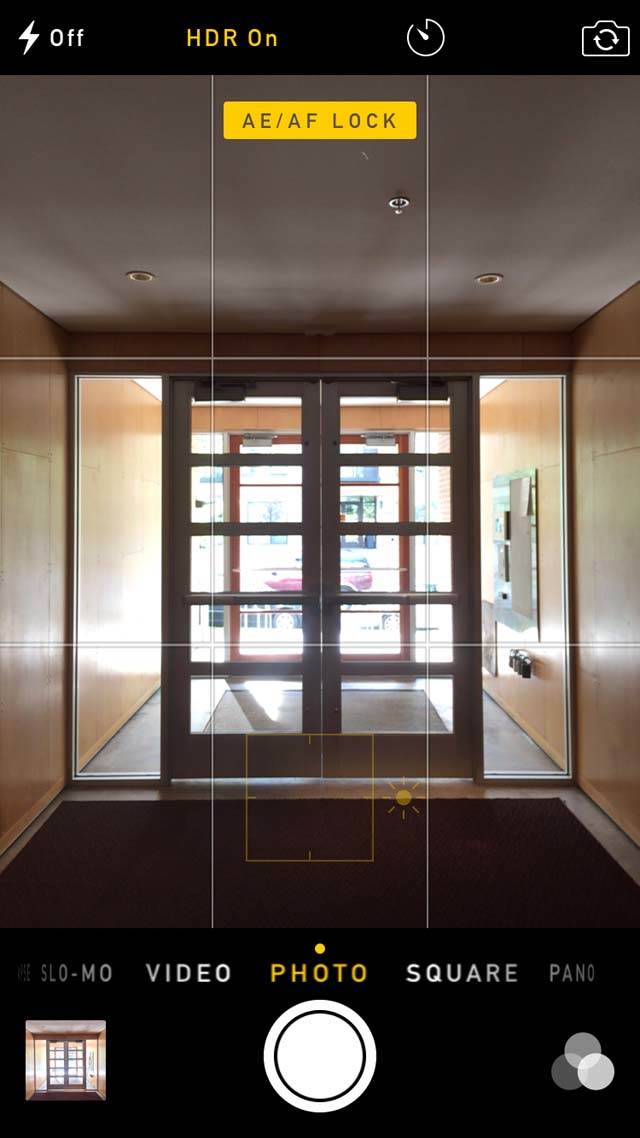
I thought it needed something extra, so I added in some light rays (using the Rays app) and I liked how it looked after I made it black and white:

But then I noticed two problems. I didn’t realize that the rug in the foreground was too far to the left when I shot this, and the shadow of the doorframe on the left was giving away the direction of the sun, which didn’t line up with my light rays:
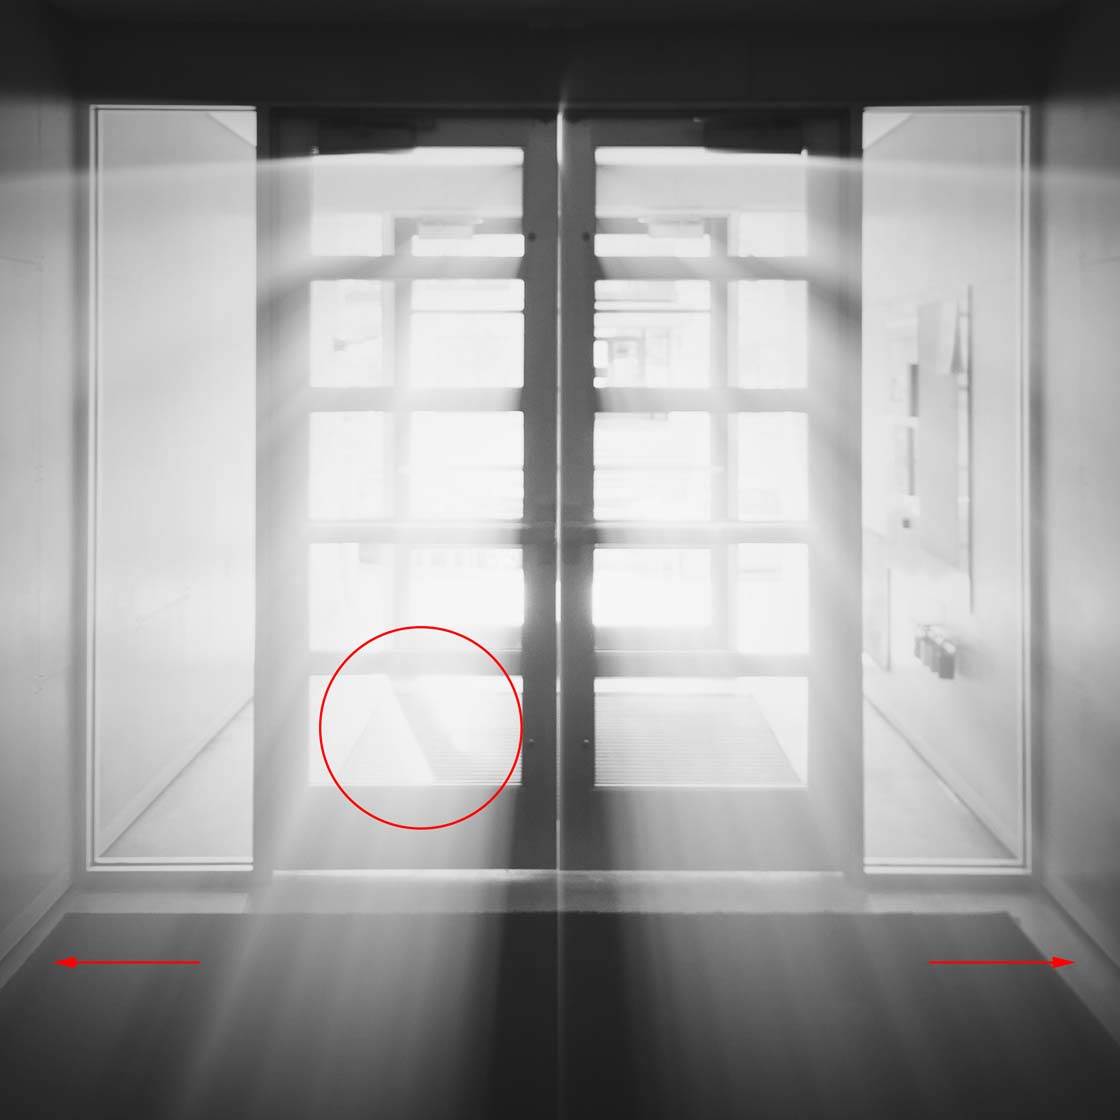
At this point I could have started all over on the edit, but there’s an easier fix that you can do in the Superimpose app to create a perfectly symmetrical shot. Basically, you can just mirror the shot (like you saw in tip 7 above), and then mask out the problem areas:
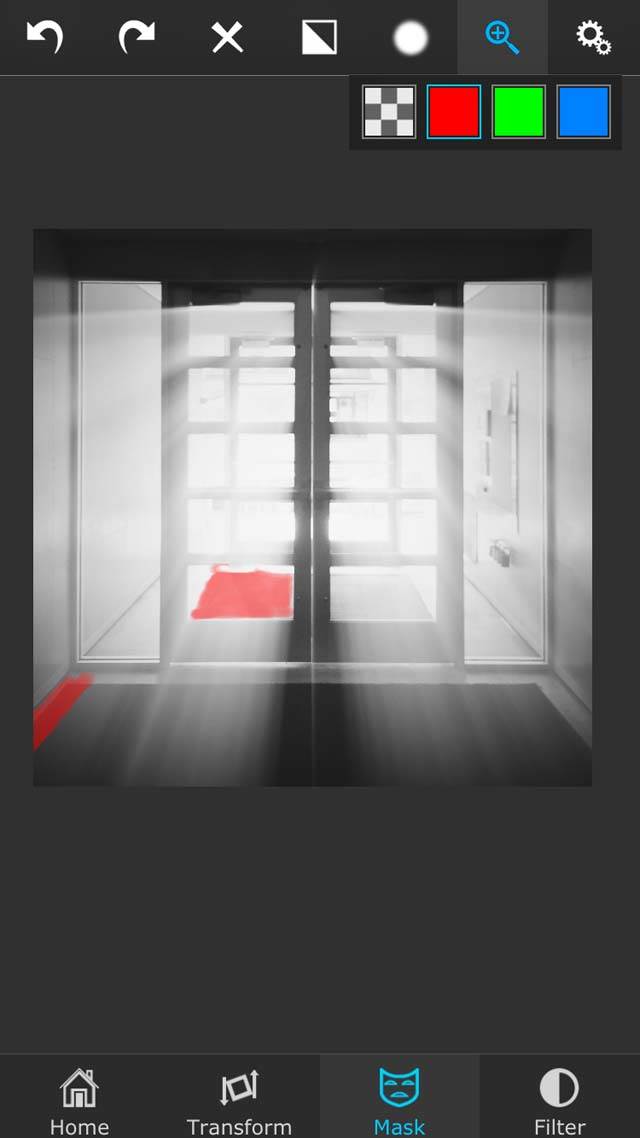
I decided to leave some sections of the photo as they were in real life, so that it wouldn’t be a perfect mirror. Here was the end result:

Conclusion
In this tutorial you’ve learned tips to make it easier to shoot perfect symmetry, and also some tricks to help you fix small mistakes that happened when you were shooting.

Sometimes you’ll nail symmetry perfectly when you shoot, which is a great feeling. But other times you might need a little help from an app or two.

Either way, with dedication and perseverance you’ll soon be creating perfectly symmetrical photos that are guaranteed to wow and mesmerize your audience.


Thanks for these fantastic tips Eric. It just goes to show that there’s more to capturing perfect symmetry than we might think!
Thanks a lot, Kate!
Thanks, Rosa! I hope they prove useful to you.
Great stuff Eric